What is your question about?
Select the category your question is about below.
Register and Login
You can choose from the Salesforce Authenticator and third-party Authenticators (Google Authenticator, Microsoft Authenticator, Authy, LastPass Authenticator, etc.). If you use the Salesforce Authenticator, you get a push notification on your phone every time you log in. With a Third Party Authenticator, you have to copy a code from the app into the application.
If MFA is required for you, you will immediately be given the option to use the Salesforce Authenticator when you log in. By clicking the "Use another authentication method" link at the bottom of the page, you can use a third-party authenticator.
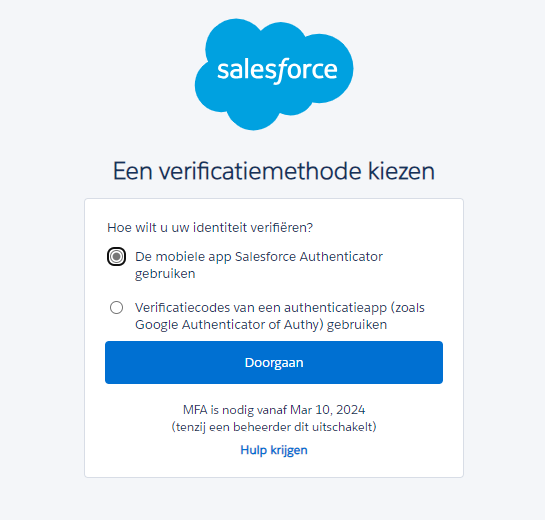
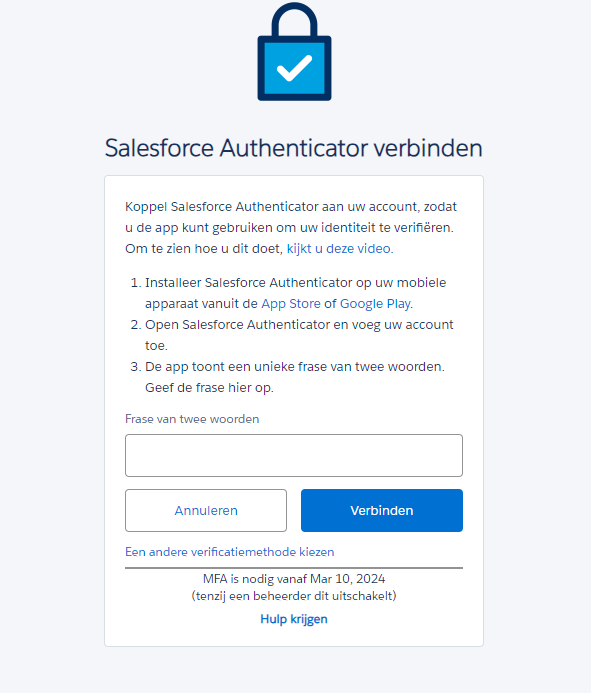
If you have chosen the Salesforce Authenticator as your authentication method, the app will display two words which you need to enter on the form in the application. If you do not immediately see this two-word phrase, click the "add an account" button in the app. After entering the two words, press "connect" in the application and the phone will be connected to your account. You will receive an email as a confirmation. The connection process may take a minute.
Are you using a Third Party Authenticator? Then you have to use the app to scan a QR code. Then the app will generate a six-digit code for you. When you enter the code into the form in the app and click "connect," the app will be connected to your account. You will receive an email confirmation. The connection process may take a minute.
If you have already set up an MFA connection, you can log in with username and password as usual. After submitting the correct login credentials, each login attempt will prompt you to verify your identity using the Authenticator app.
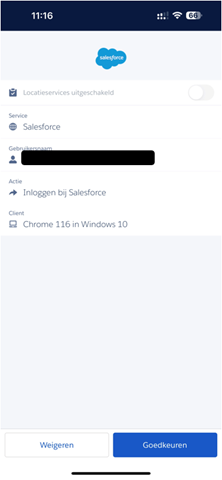
If you have chosen the Salesforce Authenticator as your authentication method, you will receive a push notification on your smartphone. If you do not receive a push notification or you cannot click on the push notification; open the Salesforce Authenticator app. After opening the app, you can confirm the attempt to log in.
Have you decided to use a Third Party Authenticator? When logging in, you will be asked to enter a six-digit authentication code. This code is produced by the Authenticator app you used to connect your phone according to the previous paragraph.
A user session in the VMS is limited to a maximum time of inactivity (default is 2 hours). After that, you are automatically logged out and need to log in again with username, password and MFA.
When using the Salesforce Authenticator app, you can take advantage of a 'remember me' feature based on the device's GPS location. You can do this by checking the slider just behind "Always approve from this location. Then the Salesforce Authenticator app will check the same GPS location the next time you log in and automatically skip the MFA step if you are within an approved area.
Are you using a third-party Authenticator app? Then it is not possible to skip the multifactor authentication step when you log in.
Is your cell phone broken, lost or you have a new one and therefore you can't log into the VMS? No worries: contact the Hiring Desk to help you further.
The client may have chosen SSO (Single Sign On). This means that you can log in without having to enter login information. The Hiring Desk will link your account to the system of the company where you work, so that you as a client will be logged in immediately. The login button is located on the specific Hiring Desk page. If SSO does not work, contact the Hiring Desk.
Should your assignment be known to us, we will create an account for you and send you login information. If the assignment is not known to us, the TL or CM will first have to share your (assignment) data with Staffing MS. First check with your TL or CM whether they have forwarded your personal data to Staffing MS. Are you still missing your login details? Contact us via our contact form or at basic-fit@staffingms.com and we will send you new login details. In your mail, please use the subject "I have not received login details". Please note that the mail with these details may end up in your spam box. You then have 48 hours to activate your account. The password must be typed and not copied and pasted.
You should have activated your account within 72 hours. If you have not done so, please contact us via our contact form or via basicfit@staffingms.com and we will send you new login details. The password should be typed and not copied and pasted. Please use the subject "Reset login details" in your mail.
Assignments and Change Requests
It is possible that something may change during an assignment. As soon as this happens, you will be notified. Changes that relate to the contract should again be recorded in a new order confirmation. The freelancer will receive an email requesting to check and approve the new order confirmation. If there are any questions regarding the new order confirmation, please contact the Inhuurdesk.
When you are logged into the Hiring Desk Portal you will find "Change Requests" under the "Assignments" tab. When you click "Change Requests" a list of the change requests made regarding your account will appear.
The NAW data of the freelancer is recorded in the employee card. You can find these as follows.
Log into the Hiring Desk at https://hiringdesk.basic-fit.com/. Go to the "Assignments" tab and then select the appropriate assignment. From there, click on the employee's name. You will only see a small portion of the freelancer's data at first. Once you click "Show full document," the rest of the data will come up.
Go to the appropriate assignment using the link in the email or log in to the Hiring Desk. Go to the assignment from your tasks on the main page or click on "Assignments" and filter by status. At the top right you will see a button that allows you to approve the assignment. Check the assignment carefully before approving it.
To do so, contact us directly via our contact form or via basic-fit@staffingms.com using the template below and use the subject line "Change of VAT obligation" in your mail:
Template
Dear, I have recently become VAT liable (no longer). You can adjust my VAT to 21%/0% as of (DATE) for assignments at (CLUB A, CLUB B, etc.).
Staffing MS only adjusts the hourly rate at the request of Basic Fit. Contact your TL or CM, they will make a change request.
There should be a separate assignment for each club where you teach. For each assignment, Staffing MS needs to receive the data from Basic-Fit. Check with your TL or CM to see if they have forwarded the assignment for you to Staffing MS and if not, if they would like to do so.
To do so, contact us directly via our contact form or at basic-fit@staffingms.com using the template below and use the subject line "Cancel order" in your email:
Templates:
Best,
I, (NAME), do not teach at club (CLUB NAME). Can you please cancel this assignment.
OR
I, (NAME), no longer teach at club (CLUB NAME), since (DATE). Can you cancel this assignment as of that date?
Basic-Fit must notify Staffing MS of contract extensions. To do so, link with the TL or CM. They will share this request with Staffing MS.
In your assignment, you can see who is TL or CM. See the name of the TL in the "manager" box and the CM in the "budget manager" box. If you do not find this information, please contact us through our contact form or at basicfit@staffingms.com and in your email use the subject line. "Who is my manager?"
Digital file
Once an order is created and approved, the order is provided with an order confirmation. The order confirmation can be found in the order itself under "File Documents," as you can see in the example below.
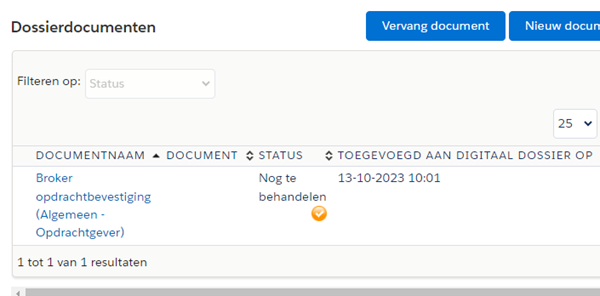
Both a client and a freelancer have their own files. These are different places where various documents are safeguarded.
The freelancer has his own card in which the data of the organization are guaranteed, including the financial data for payment. In addition, it must contain a number of documents, such as an extract from the Chamber of Commerce. Once this information is incomplete, invoicing and / or payment is not possible.
In addition, each freelancer has his/her own assignment file for each assignment he/she performs. In this file, among other things, the order confirmation is guaranteed. In addition, it depends per client which further documents are contained therein.
The digital file is part of compliancy. Files include documents that have been agreed upon with the client. Depending on the type of document, you have to approve it, or it is included for notification.
Note that certain documents must be approved with some clients before actual hours can be written. These documents are distinguished from the rest with a red cross.
Hours and Invoices
It is possible to view the timesheets in the past. Not being able to see the timesheets has to do with a filter. By default it is filtered on the current year. So should it happen that you need to look at timesheets from the previous year, you need to change the filter to that year.

Hours worked (and claims) must be recorded weekly. This is done by the instructor. Recorded hours must be reviewed by the manager and budget approver approved before they can be billed.
Timesheets are automatically prepared on a weekly basis. If you - in any case - want to create your own timesheets, you can do so as follows:
Go to the "Timesheets" tab. All timesheets that are already present are shown here. With the button "Create a new timesheet" you can then create a new timesheet.
Note: If you want to copy an existing timesheet because the new timesheet will be the same, you can also open an existing timesheet and choose "Copy timesheet".
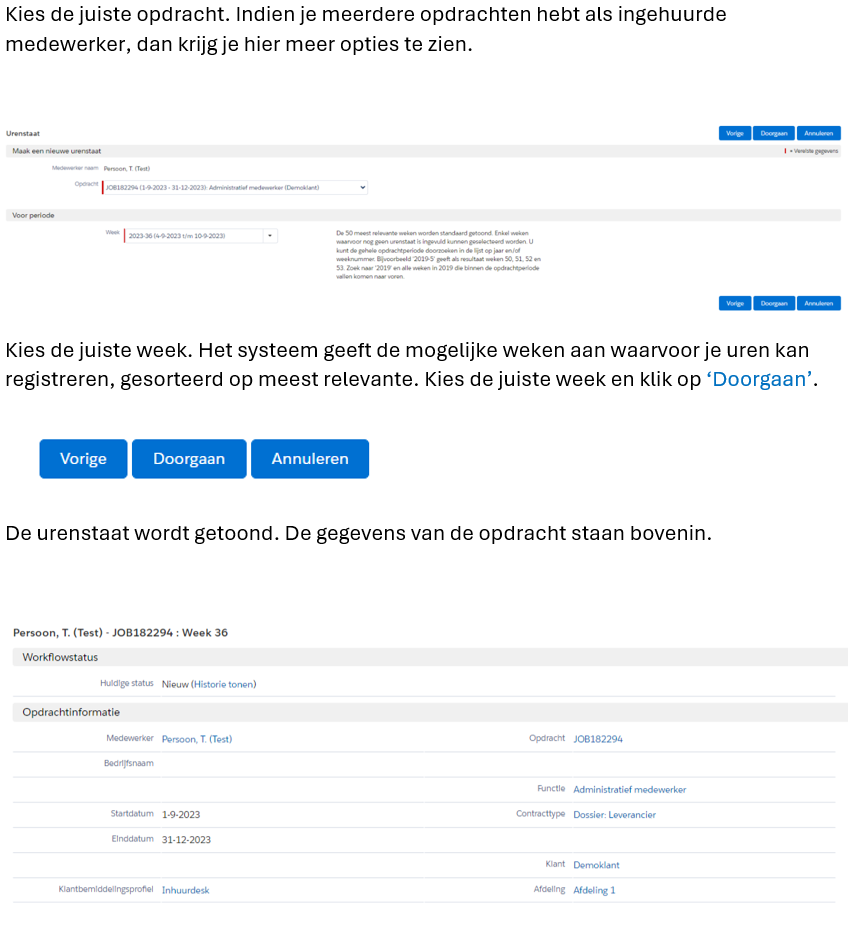
The status of the timesheet is 'New'. All available hour types are displayed on which the freelancer may submit the hours. Enter the hours.
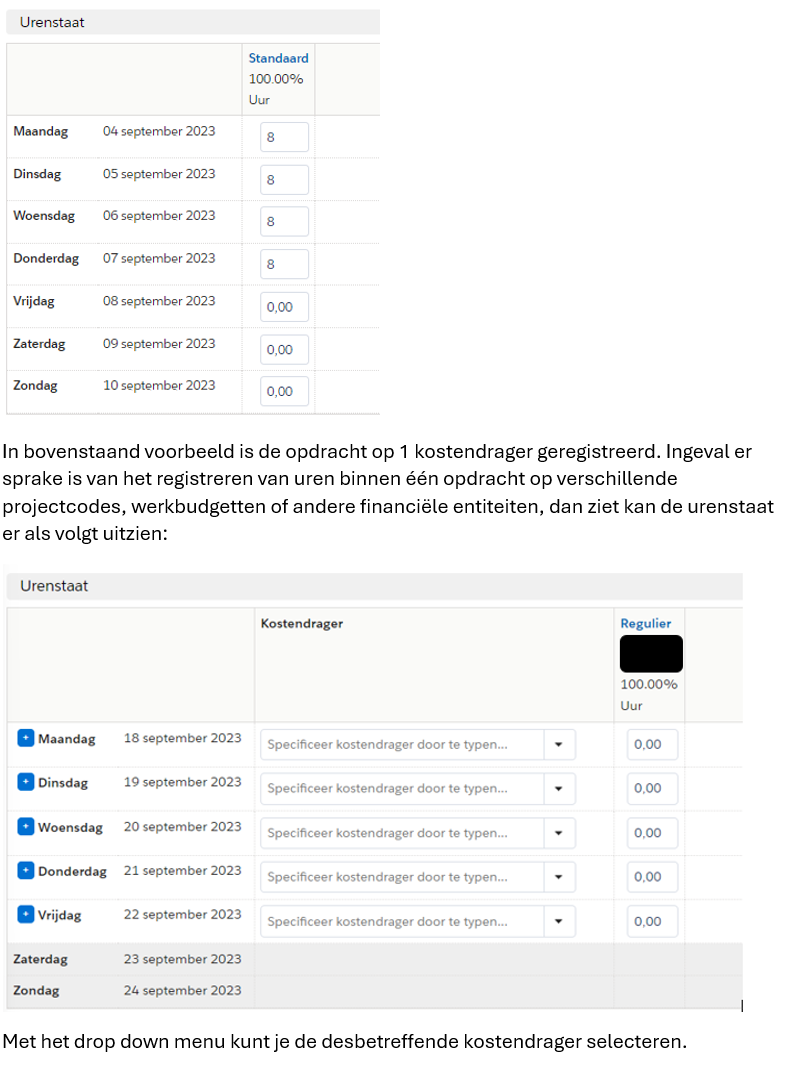
Here it is possible to add an additional financial characteristic per line. In addition, you can use the 'Additional line' button (the blue plus in front of the day) and add an additional line for the same day.
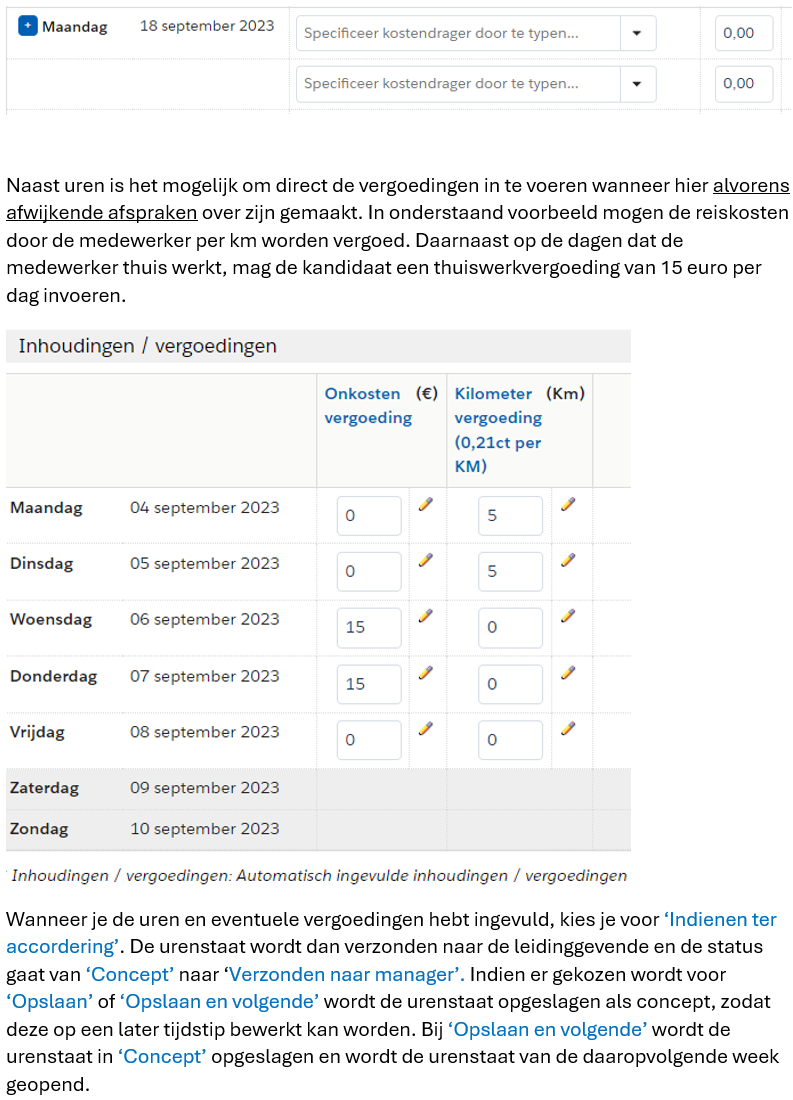
Hours worked (and claims) must be recorded weekly. This is done by the freelancer. Recorded hours must be approved by the supervisor before they can be billed. Timesheets are automatically prepared on a weekly basis. The freelancer will receive an email about this.
Follow the link to the timesheet. Another way to access the timesheet is to log in at https://hiringdesk.basic-fit.com/ and click on the Timesheets tab. All timesheets already present will be displayed here.
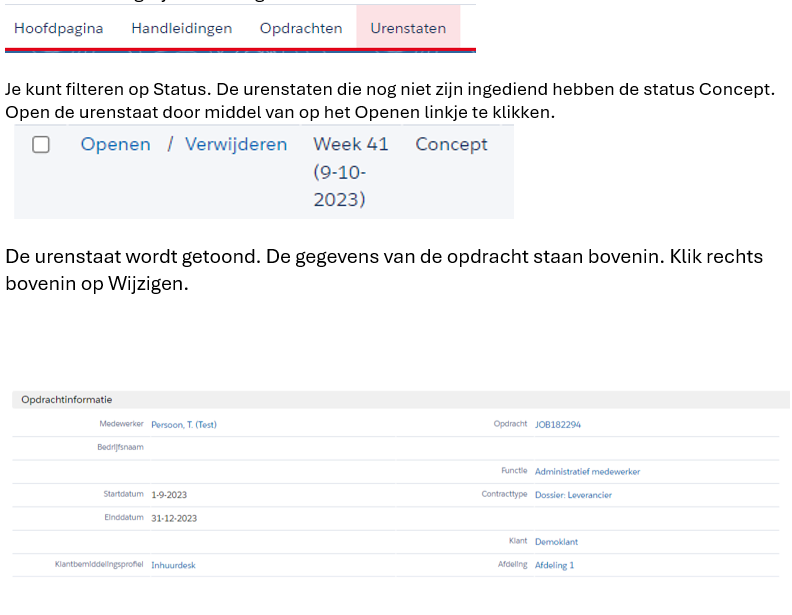
The status of the timesheet is Draft. All available hour types are shown on which the employee may submit the hours.
Enter the hours.
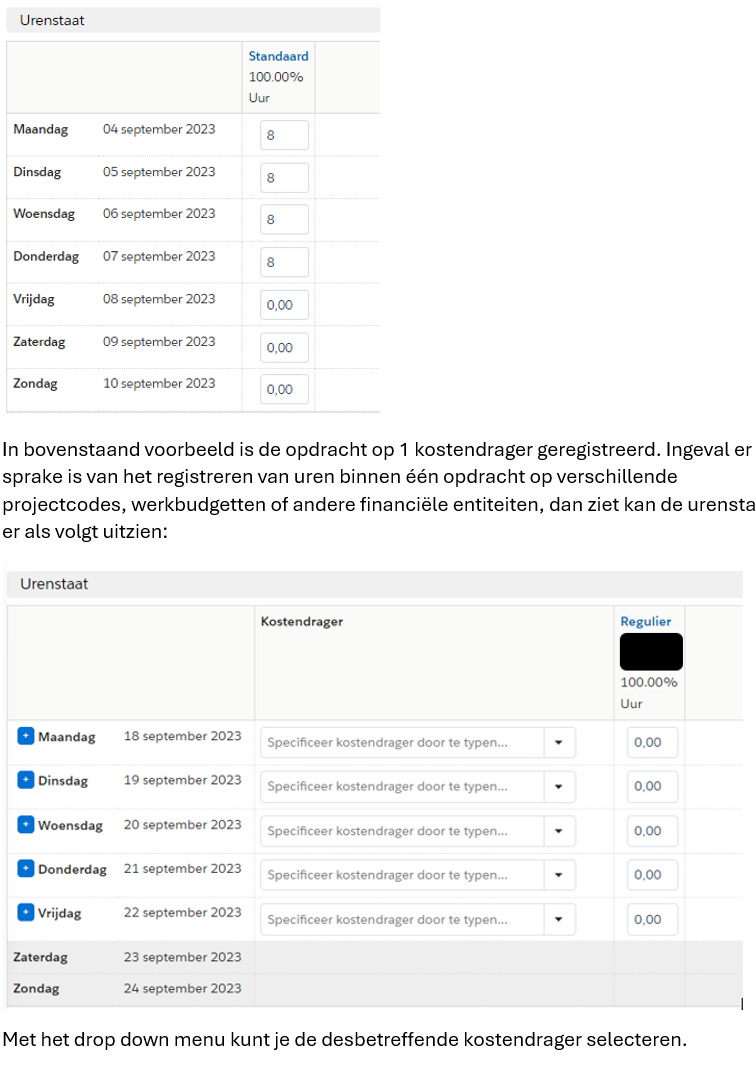
Here it is possible to add an additional financial characteristic per line. In addition, you can use the 'Additional line' button (the blue plus in front of the day) and add an additional line for the same day.
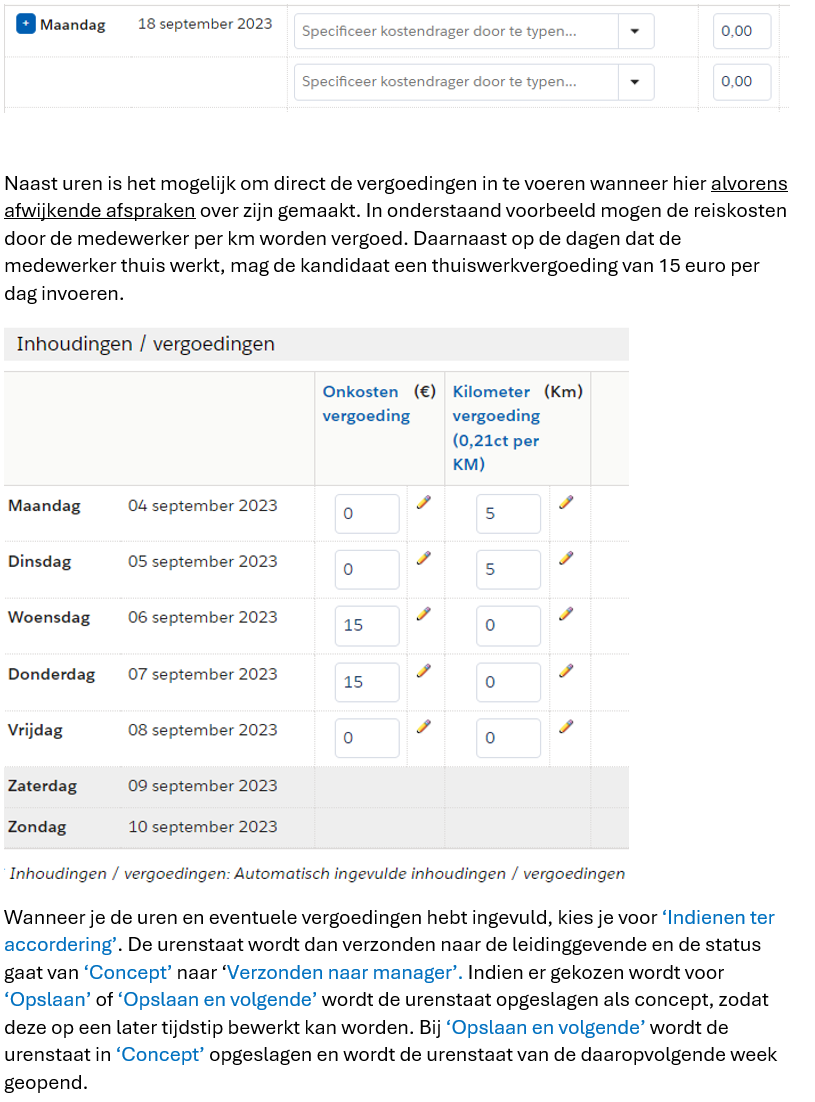
Unfortunately, this cannot be stopped. If you have not worked, you can leave the timesheet blank and do not need to submit it for approval.
Yes, this must be because there are several TLs and CMs are required to approve the timesheets.
This means you have completed the timesheet and it is now on file with the TL for approval. You no longer need to take any action.
This means that you have completed the timesheet, it has been approved by the TL and is now on file with the CM for approval.
This means that your timesheet has been approved by the TL and the CM. The timesheet is now ready for invoicing. You do not have to take any further action. If you press the blue 'Process' button in the upper right corner, there will be no further consequences. The status of the timesheet will become 'Processed by freelancer'. Even then the timesheet is ready for invoicing.
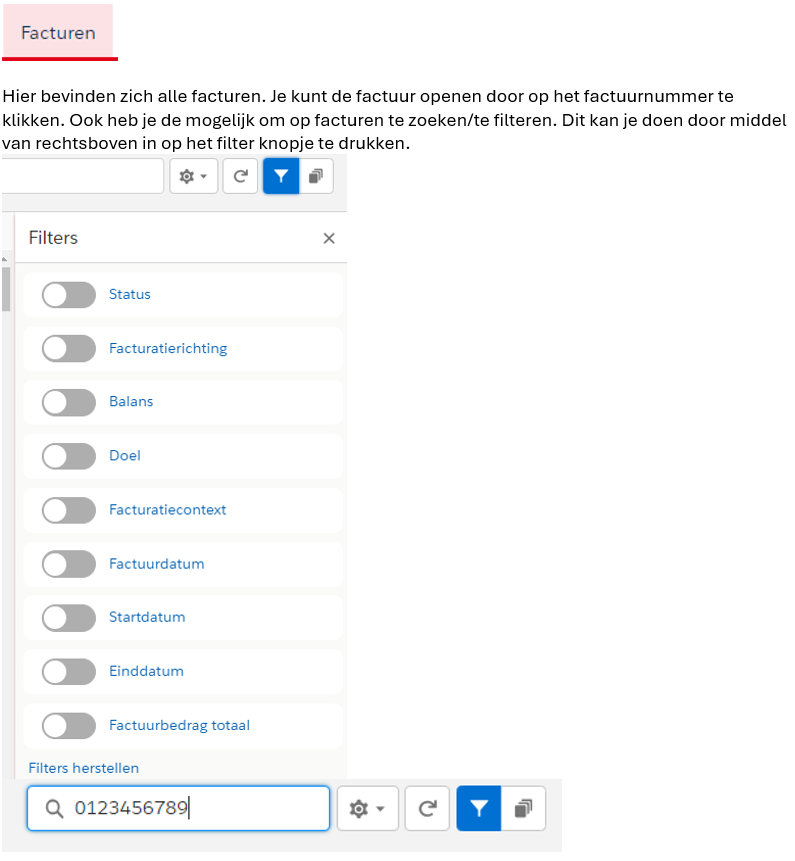
To view invoices, you must first log in to the Hiring Desk. Go to the "Invoices" tab.
E-invoices
The application generates e-invoices. All data required (in accordance with the law) on an e-invoice are stored in the application. The application administrator can set up the invoice format of the PDF documents using data mapping. This allows the system to create PDF documents that meet the requirements as set by the Tax Administration. If desired, the generated PDFs (e-invoices) can be saved by freelancer or customer in their own administration.
Billing Form
The Hiring Desk invoices on a reversed-billing basis. This means that the Hire Desk creates the invoices based on the hours and fees approved by the client and acts as cashier. This means that the Hire Desk collects the money from the client and pays out to the freelancer upon receipt. As a freelancer, all you have to do is check for accuracy and track progress.
Below we list for you the processes surrounding the payment of worked and approved hours. In doing so, it is important that you follow the client's agreed billing calendar (see below).
Billing process
The reversed-billing process works as follows:
- The instructor(s) is responsible for timely submission of hours worked - whether or not in the VMS Nétive or in the client's system.
- The hiring manager is responsible for timely approval of submitted hours.
- The approved hours are invoiced. When exactly this takes place can be found in the billing calendar of the respective client.
- The Hiring Desk prepares and sets up invoices for the instructor(s).
- When the invoices are ready, the instructor(s) an email notification about this with a link to the invoice.
- The instructor(s) has 72 hours to add their own invoice number to the invoice. Once this period has passed, this is no longer possible.
Below we list for you the processes surrounding the payment of worked and approved hours. In doing so, it is important that you follow the client's agreed billing calendar (see below). This is because deviation from the timelines leads to a delay in payment. You yourself play an important role in timely payment.
It is important that you take care of:
- Complete data (e-invoicing + file) in the Hiring Desk VMS system.
- Timely recording and approval of hours worked.
Re 1. Complete data (e-invoicing + file) in the VMS* system of the Hiring Desk:
An assignment must have reached "final" status. This means that both the client (hiring manager/budget holder) and the freelancer must both accept the assignment (digitally).
The freelancer and assignment file must be complete. Therefore, all documents (requested by the client) must be accepted and entered into the VMS system and, where necessary, reviewed for accuracy by the Inhuurdesk.
All financial data must be entered before e-invoices are created. Without this e-invoicing data, no invoice will be created and no payment will follow. Required data are postal code, house number, street name, city, VAT number, invoicing contact person, e-mail address invoicing contact person, bank name and bank IBAN. The required fields become visible if you are going to change the freelancer data. The fields are marked with a blue '|'.
The freelancer file must be complete. The extract from the Chamber of Commerce and documents such as a Declaration of Payment History must be submitted and approved by the Commissioning Desk.
Re 2. Timely recording and approval of hours worked:
Once the assignment has begun, hours must be recorded and approved before an invoice can be issued. As an outside employee, you are responsible for ensuring that hours worked are recorded weekly and submitted to the manager for approval. The client's hiring manager is responsible for ensuring that recorded hours are approved in a timely manner.
Billing
Only hours that have been approved are invoiced monthly in accordance with the invoicing calendar (provided, of course, that the digital files are in order). Timesheets that reach the status 'Sent to freelancer' too late will only be included with the next billing round (i.e. one month later). Interim invoicing is unfortunately not possible.
As a freelancer, you will receive an automatically generated email when the invoice has been created. You then have the opportunity to check the invoice and for 72 hours it is possible to enter your own invoice number if desired. This is to facilitate a link with your own administration. If you do not change the invoice number within 72 hours, the automatically generated invoice number will be used to ensure the billing and payment process is not delayed.
After receiving the invoices, the client pays within the agreed payment period. Payment of freelancers can only take place after receipt of the amounts due from the client by the Hiring Desk. Depending on the term agreed upon in the hiring conditions, the Inhuurdesk will pay the freelancer within 2 to 5 business days after receipt of payment from the client.
Summary: Invoicing takes place in the first days after the close of a month, in accordance with the invoicing calendar (see heading "Invoicing Calendar"). Only after payment from the client to the Hiring Desk, freelancers are paid by the Hiring Desk.
Please note: Deviation from the process described here is not possible. Invoices self-created by a freelancer will NOT be processed. You will NOT receive a message or notification of this.
*VMS = Vendor Management System (application).
We pay according to the Billing Calendar. Payment can only be made when Staffing MS has received the funds from Basic-Fit.
If the hours have not yet been invoiced, the timesheet can be modified. Go to the corresponding timesheet and click "Edit".
The 'warning' you see next indicates that the modified timesheet will be sent again to your client for approval. Click 'Continue' if you agree:

Then make the desired changes. You change the hours or allowances to the desired number. So if you worked 7 hours instead of the specified 8 hours, you remove 8 hours and enter 7 hours.

Then click "Submit for approval. After this, enter any comments for the client (not required). After this click on 'Continue'. The timesheet has now been resubmitted to the client.
If these are hours that have already been billed, please contact the Hiring Desk.
Hours submitted must be initially approved by the manager and budget approver. As long as the manager and budget approver have not given their approval, the timesheets are still on status 'Sent to manager'. After approval of the manager the timesheets will be on status 'Sent to freelancer'. From this moment on the timesheets are billable.
The condition for invoicing is always that the data are completely entered in the Hiring Desk and also the digital file is completely filled with the correct and approved documents.
The instructor has the option to add his/her own invoice number to the invoice. After the Hiring Desk prepares the invoices, the instructor an e-mail notification about this with a link to the relevant invoice. This link, as well as the ability to edit the invoice number, is only valid for 72 hours. Once the 72 hours have passed, it is no longer possible to add your own invoice number to the invoice.
